ESP32 ESP-IDF Quick Start
The following instructions should work for any ESP32 development board or module. The steps below illustrate how to test-drive Deploy the Fleet using a sample project. We also cover how to add the SDK to an existing project.
Before You Start
Before continuing, create a product in Deploy the Fleet if you haven’t already.
What are you trying to do?
- I want to use a sample project to test-drive Deploy the Fleet
- I already have a project and want to integrate Deploy the Fleet
Example Project
Follow these instructions if you would like to quickly get up and running to test-drive Deploy the Fleet with a sample project we provide. It has everything out of the box configured to connect to the service. If you have an existing project to which you want to add Deploy the Fleet, skip to the Add to Existing Project section below.
Before continuing, make sure you have the ESP-IDF installed in your environment.
- Clone the Production ESP32 Playground project.
- Open the project in your code editor of choice.
- Change directories to examples/dtf_simple.
- Run
idf.py menuconfig - Navigate to Component config -> Production ESP32 Playground -> WiFi
- Configure your WiFi SSID and password
- Save and exit
menuconfig - Open main.cpp in the example project
- Uncomment the line
#define DTF_PRODUCT_IDand set it to your Deploy the Fleet product ID.
The sample project is a very simple firmware that repeatedly outputs the current version over serial after connecting to WiFi and checking for updates from Deploy the Fleet. Proceed to the Updates From Deploy the Fleet section below.
Add to Existing Project
This section explains how to integrate an existing project with Deploy the Fleet using the SDK. You can either add the SDK to your project as a managed IDF component or by using git submodules.
Install the SDK as an IDF Component (Recommended)
- Open a terminal in the root of your repository.
-
Run the following command which will install the 2.0.2 version of the SDK. You can change the version by specifying a different
git-refor get the latest version by not providing thegit-refargument.idf.py add-dependency --git https://github.com/deploythefleet/dtf_sdk.git --git-ref v2.0.2 dtf_sdk - Run idf.py menuconfig
- Navigate to Component Config->mbedTLS->Certificate Bundle and ensure that Enabled trusted root certificate bundle is enabled. It is by default. If you need more flash space you can change the option from Use the full default certificate bundle to Use only the most common certificates and the SDK will still properly connect to Deploy the Fleet.
- Exit menuconfig and save any changes made.
Install the SDK as a git submodule
- Open a terminal in the root of your repository.
-
Run
git submodule add https://github.com/deploythefleet/dtf_sdk.git ./components/dtf_sdk - Run idf.py menuconfig
- Navigate to Component Config->mbedTLS->Certificate Bundle and ensure that Enabled trusted root certificate bundle is enabled. It is by default. If you need more flash space you can change the option from Use the full default certificate bundle to Use only the most common certificates and the SDK will still properly connect to Deploy the Fleet.
- Exit menuconfig and save any changes made.
- Modify the CMakeLists.txt file in the component to which you are adding the SDK. Either create a
PRIV_REQUIRES dtf_sdkor adddtf_sdkto an existingPRIV_REQUIRES.
Add Code to Request Updates
With the SDK installed you now need to decide where, in your project, you will add logic to request OTA updates from Deploy the Fleet. This is completely up to you and will depend on your project requirements. The only prerequisite is that your device needs an active connection to the internet when the SDK is called. Once you have decided where to call the SDK, make the following code changes.
Make sure the SDK header is included at the top of your source file.
#include "dtf_ota.h"
Add the following code wherever you would like the update process to occur.
const dtf_ota_cfg_t cfg = {
      .product_id = [YOUR_DTF_PRODUCT_ID],
      .reboot_option = DTF_NO_REBOOT};

DTF_OtaResponse ret = dtf_get_firmware_update(&cfg);
IMPORTANT: Make sure you replace the [YOUR_DTF_PRODUCT_ID] placeholder in the above code with your own value. The product ID can be found on the Settings tab for your product.
Updates from Deploy the Fleet
With your project now configured to get updates from Deploy the Fleet, you’re ready to upload firmware releases to the service.
Build Your Firmware
Before you can upload your firmware to Deploy the Fleet you need to build it.
- Build your project by running
idf.py build - The binary will be created in the build folder and will have whatever name you have specified in the CMakeLists.txt file in the root of your project. If you are using the sample project from above the file will be named dtf_simple.bin.
OTA PARTITION SIZE: Make sure your configured OTA partition size is sufficient for the size of your exported firmware binary.
WARNING: Deploy the Fleet can not validate that your firmware binary will fit in your device’s OTA partition. You should validate this prior to uploading the firmware.
Flash Firmware to your Device
Now that you’ve made your firmware Deploy the Fleet aware, flash it to your device.
- Upload the firmware by running
idf.py flash
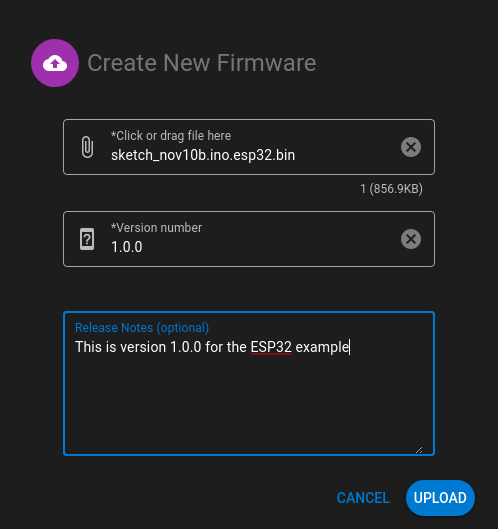
Upload Firmware to Deploy the Fleet
- Open the Deploy the Fleet Management Console.
- Navigate to the Deployments page for your product.
- Click Create a new deployment.
- Provide a name and description.
- Attach the firmware binary you built above. The version should automatically populate.
-
Click Deploy now.
Your First Update
Now that everything in your firmware is configured let’s create an update.
- If you are using the Playground, modify the contents of the version.txt file in the root of the project to be 2.0.0 . If you are integrating into your own project, update the firmware version using your preferred method. Alternatively, you can specify a
custom_versionattribute on thedtf_ota_cfg_tstruct. - Compile the project by running
idf.py build. - Open the Deploy the Fleet Management Console.
- Navigate to the Deployments page for your product.
- Click Create a new deployment.
- Provide a name and description.
- Attach the firmware binary you built above. The version should automatically populate and now indicate 2.0.0.
- Click Deploy now.
- Reset your device
Your device should update and start outputting the new message indicating it is running version 2.0.0.